Web Registration - Archive
Tip
Only releases with enhancements or resolved issues for this module have content below.
Enhancements
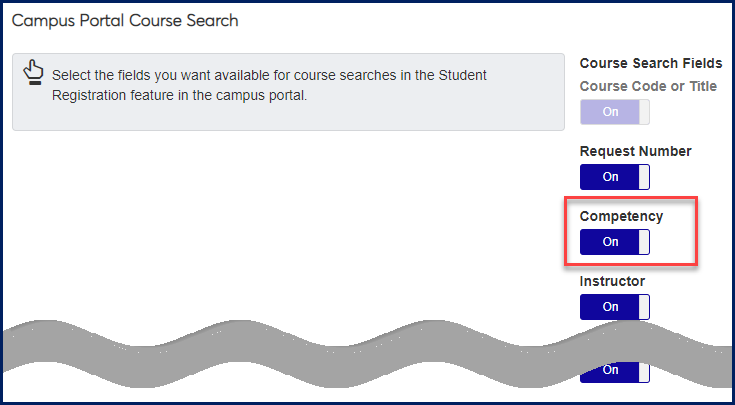
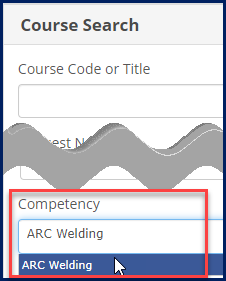
Schools using Competency Based Education (CBE) features can allow students to search for courses by competency. Administrators turn on the setting on the Registration Settings page.
Students search in the Campus Portal in the Student Registration feature.
Important
CBE features are available for schools that have the Competency Based Education license.
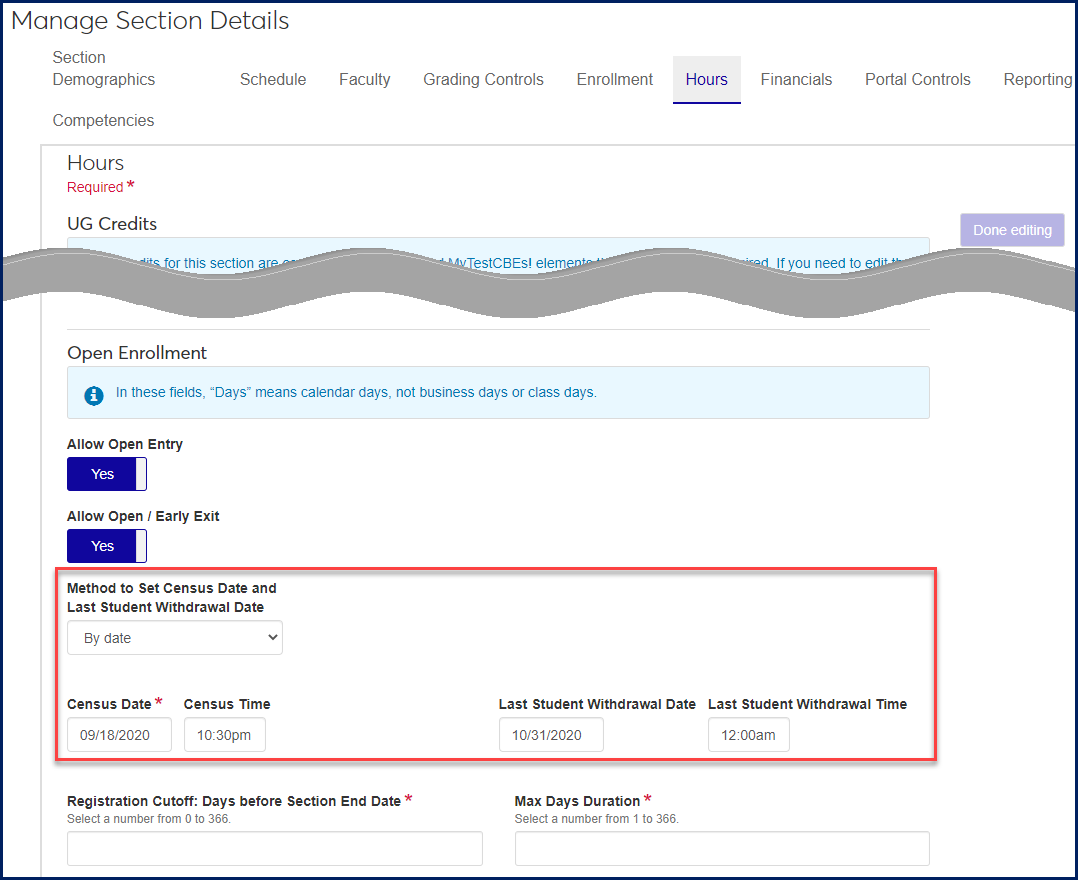
Schools using the Open Enrollment feature can select a method calculating the Census Date and Last Student Withdrawal Date for Open Enrollment catalog courses or sections.
For any course or section, there are three options:
By date
By number of days after the start date
By percentage from the start date to the end date
Edit the Manage Course Details page or Manage Section Details page to set the method.
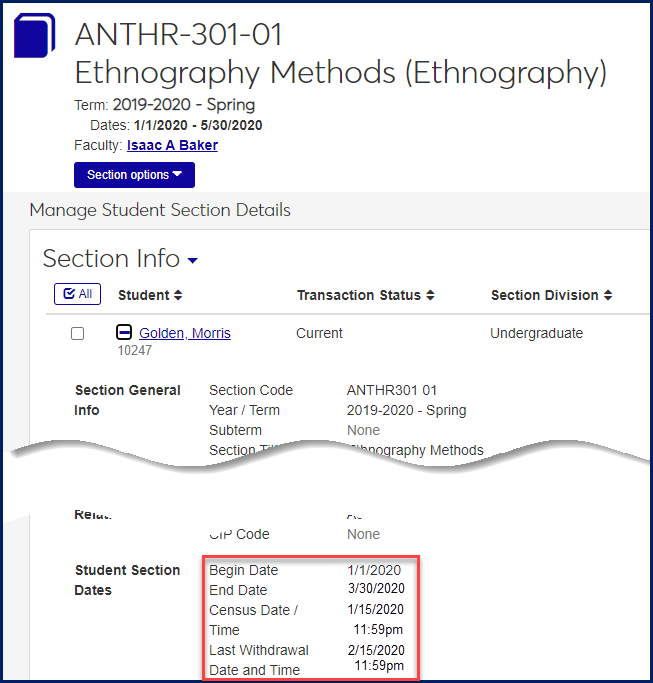
When a student registers for the section, we use this method to calculate the individual student's Census Date and Last Student Withdrawal Date. The dates appear in the student course records such as on the section's Manage Student Section Details page.
Begin Date: the day the student registers
End Date: the day the student's grade is entered
Census Date: calculated according to the method selected above
Last Student Withdrawal Date: calculated according to the method selected above
Important
Open Enrollment features are available for schools that have the Competency Based Education license.
Resolved Issues
Issue | Description |
|---|---|
206972 | Course Roster page loaded slowly due to a view issue. |
RN9758 | The Advising worksheet and Unofficial transcript options were missing in the Student options list on the View student notes page. |
RN13025 | Faculty hub calendar did not retrieve time slots created by the scheduled job. |
Resolved Issues
Issue | Description |
|---|---|
175652 | Grade Entry: For a student who had a Last Date of Attendance for a section, if Last Date of Attendance was not required for a particular withdrawal grade, and that grade was assigned to the student, then Last Date of Attendance became null. This issue was resolved in J1 Web 2019.4. |
203142 | The scheduled job was erroneously creating tasks to report attendance for courses that were marked to be excluded from attendance reporting. |
Enhancements
Instructors now have an improved grade-entry experience. The new format allows you to save grades for any one student at a time if you wish. The page now uses a familiar spreadsheet format, and you can sort the rows by any column.

You can also copy and paste from cell to cell, and you can fill down from one cell to any number of cells below it.


You can also filter the columns by conditions or values.
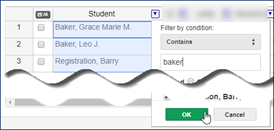
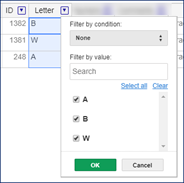
Messages remind you to fill in all required information for each student.

A number of new fields are included.
Column | Description |
|---|---|
Dual Enrollment | Available for schools with the Texas State Reporting license who have dual-enrollment students. Not editable. If 'Yes', then both Numeric and Letter grades are required. |
Start Date | Available if your school is using Open Enrollment. Date is calculated when student registers. |
End Date | Available if your school is using Open Enrollment. Date is calculated when student registers. |
Competencies | Available if your school has the Competency Based Education (CBE) license and CBE is turned on. Appears for sections designated as CBE. (If the section is set up so that competency grades roll up to the section grade, you enter or edit grades. However, if the section is set up so that grades roll down from the section grade to the competencies, then you can't enter or edit grades for the competencies.) |
On the Grade Entry page, if the student is marked as dual enrollment, both Numeric and Letter grades are required. A message reminds you, and you can't save until both grades are entered for the student.

Students can now withdraw from courses using the Student Registration Feature on the Campus Portal. Use the new settings on the Registration Administration page to select a default withdrawal grade and to edit the withdrawal messages that students receive.
Now you can change a the enrollment status in a section for one or multiple students. Use the Action button for an individual student and the Options button for all selected students.
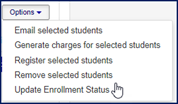
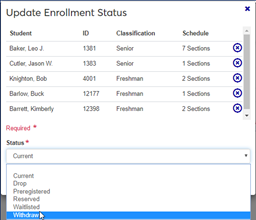
The Update Enrollment Status feature was previously called "Update Transaction Status", and it was available only for one student at a time.
These permissions have been added to the Student Management section of both the Registrar and the Registration Module Manager role.
Can add student divisions
Can add programs
Can add student term table records
All three are for the Student Information Details page on the Registration Operations hub. All three are selected by default. However, if your school created or copied roles from the Registrar or Registration Module Manager role before 2019.5, you need to select these manually in those copied or created roles.
Resolved Issues
Issue | Description |
|---|---|
171277 | On the Registration Administration hub, Create Section from Catalog, under certain circumstances, when a user created a section and viewed it in Section Entity, the census date was incorrectly showing "None." |
171436 | On the Registration Operations hub, Manage Student, General Information: the system was not allowing deletion of attributes even with the appropriate permission. |
172369 | On the Registration Administration hub, Manage Sections, Portal Controls of section details: Web Registration Override Dates were being validated incorrectly, which is now resolved. |
177930 | On the Registration Administration Hub, Manage Sections page, Fixed/Variable filter criteria was not being correctly honored. |
177933 | On the Registration Administration Hub, Manage Sections page, Clock Hours were incorrectly allowed to be edited even when flagged as Fixed. |
192328 | Error message appeared when accessing the Grade Entry page (Faculty hub, My Course List, select course, Section Options: Manage grades). |
Enhancements
The Open Entry feature allows students to enter courses throughout a term, regardless of add-drop deadlines. Early Exit allows students to finish courses before the term's end and move on to other courses. Together, the two features offer your school great flexibility. Students can accomplish more faster or complete courses outside of a term's usual boundaries.
Tip
Open Entry and Early Exit features are found in both J1 Desktop and J1 Web. See the J1 Desktop Registration section of this Release News for more information.
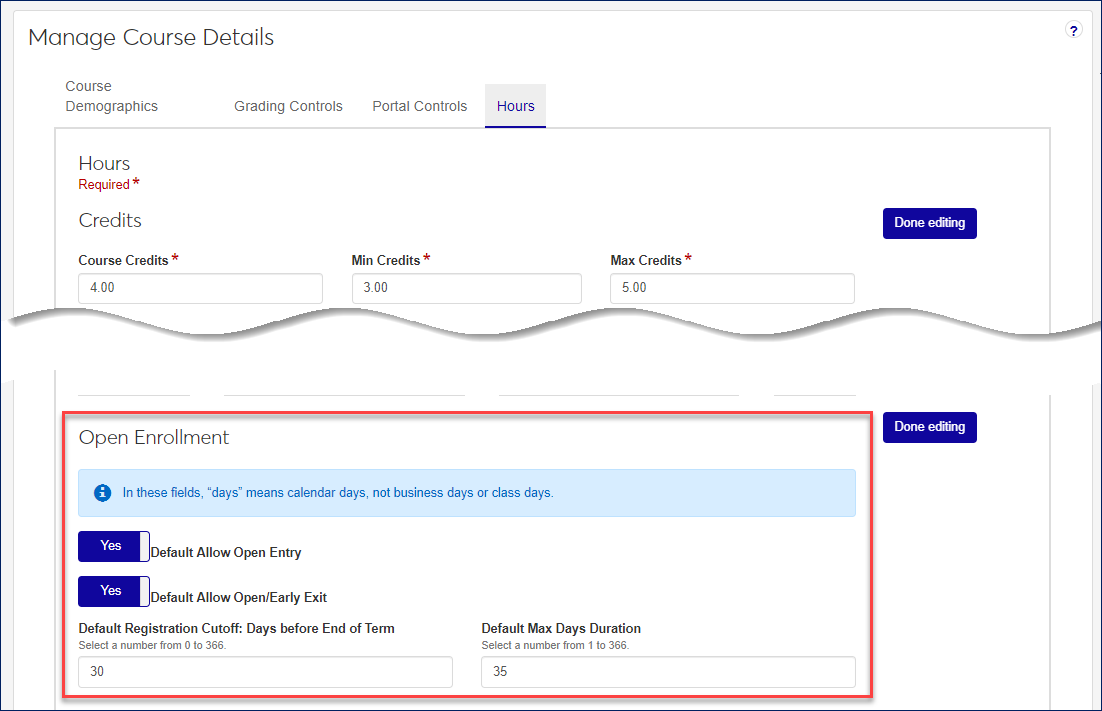
The features are powerful, but the setup is simple. Turn on Open Entry and Early Exit on the J1 Desktop Registration Configuration window, Registration Configuration tab.
Turn on Open Entry and Early Exit in J1 Web on the Manage Catalog Course Details page.
Tip
You can also turn on Open Entry and Early Exit for particular catalog courses in J1 Desktop on the Catalog window, Course Attributes tab.
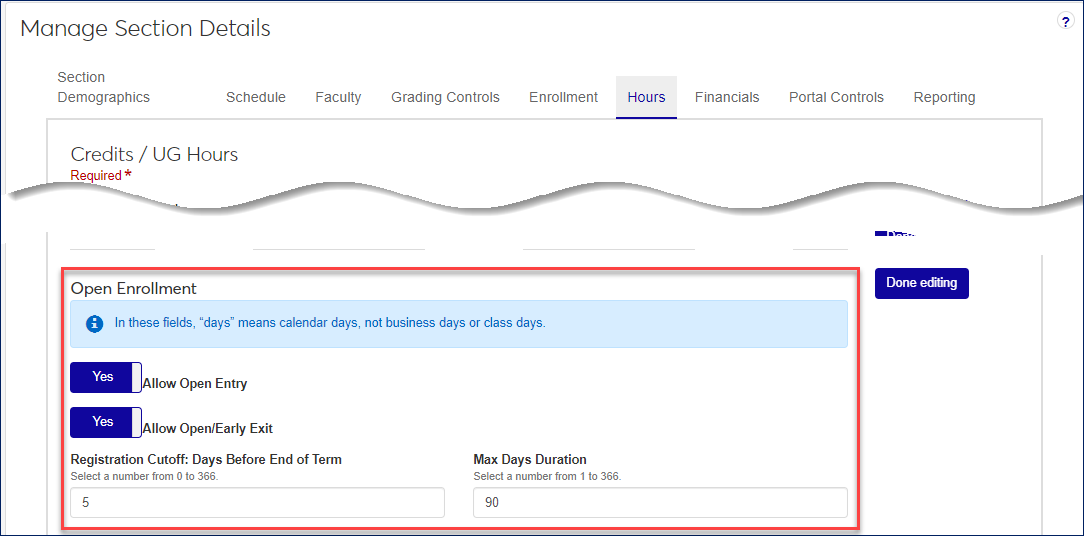
New sections you create from Open Entry catalog courses inherit the course's Open Entry and Early Exit settings by default. To change existing sections to Open Entry and Early Exit, use the J1 Web Manage Section Details page.
Note
Setting up existing sections for Open Entry and Early Exit on the J1 Desktop Courses window is planned for a future release.
Resolved Issues
Issue | Description |
|---|---|
169607 | In the Registration Approval block, students needing course approval were not displaying if the approvals were tied to cycles when they should be appearing for the advisor the same day they appeared on the Student Summary page. |
177994 | The Update button on the Drop/Withdraw Students from Year/Term modal was not enabled even when all required fields had been set. |
183264 | From the Create course page in J1 Web Registration Administration, the Create and continue editing and Create and go to list options were enabled before all the required fields were completed. |
Enhancements
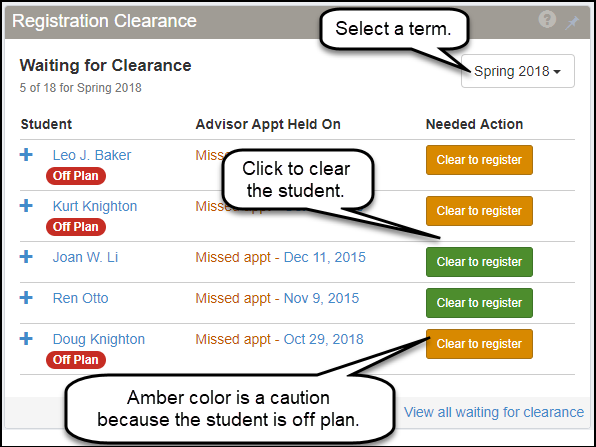
You can now clear students to register in the J1 Web Registration Operations hub.
The Registration Clearance block shows five students waiting for clearance. Select a term and click Clear to register.
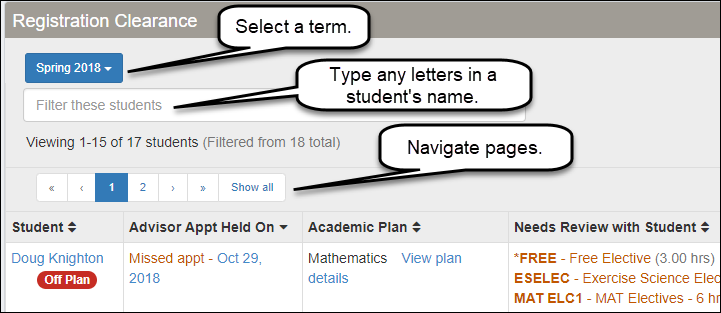
If you don't see the students you need, click View all waiting for clearance to open the full Registration Clearance list. There you can search for a student and clear them to register.

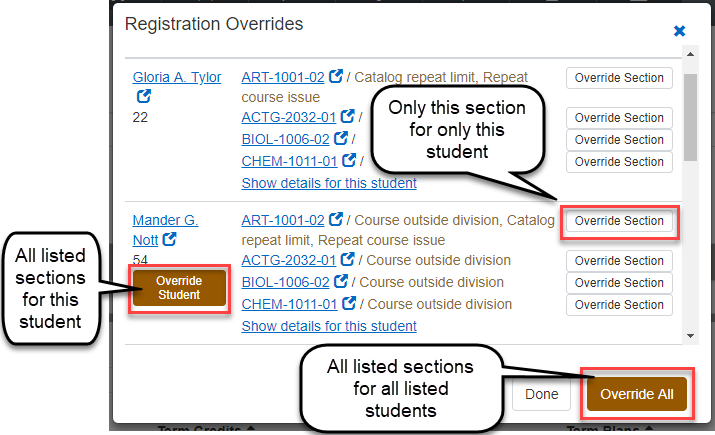
On the Student Registration page, you can now override issues for only a single section for an individual student. This complements options you already had: to override issues for all listed sections for a student, or to override issues for all listed sections for all listed students.
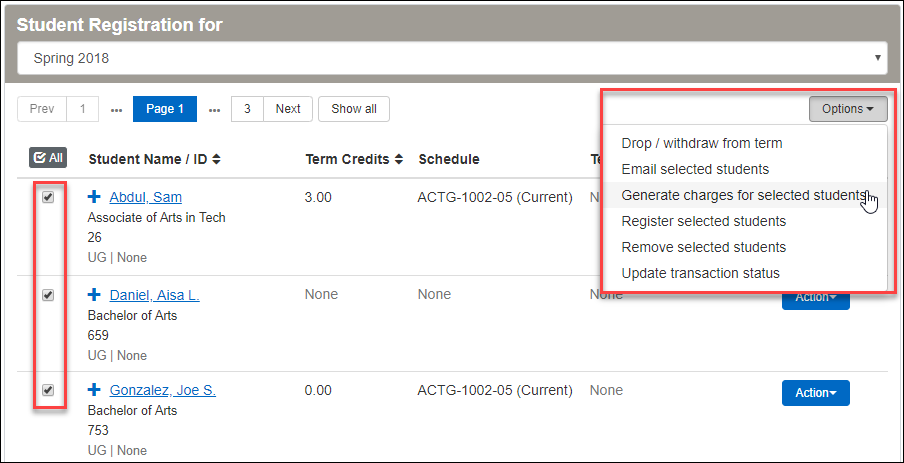
You can generate charges for one or more students from the Student Registration page.
Use the Action button to run charges for an individual student.

Select students and use the Options button to generate charges for multiple students.
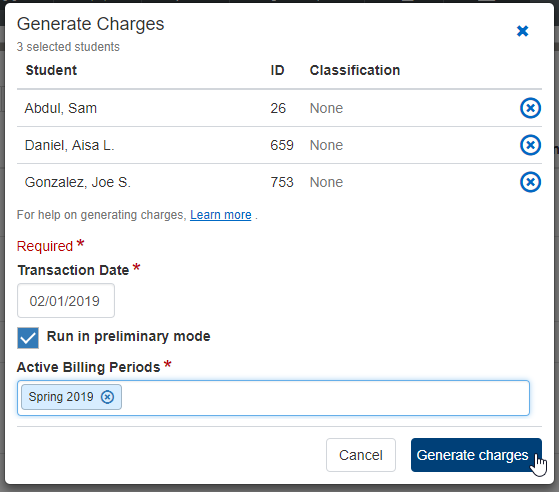
If your school uses billing periods, you select the periods to run charges for.
If your school uses year-term billing, you select a term group.
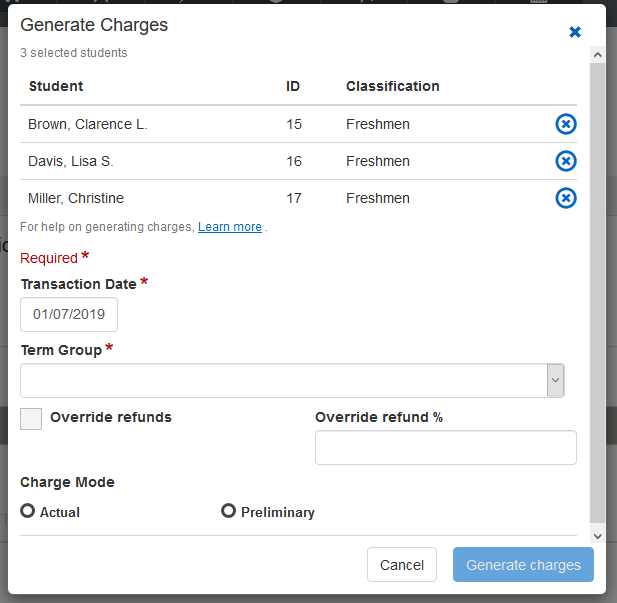
In either case, you can run the charges in preliminary or actual mode.
Resolved Issues
Issue | Description |
|---|---|
171171 | The Update transaction status procedure on the Student Registration page would fail when attempting to run the process for more than 2,100 students at a time. |
171172 | The Drop/Withdraw from term procedure on the Student Registration page would fail when attempting to run the process for more than 2,100 students at a time. |
172378 | The Manage section details page, Portal Controls tab was not saving the Restrict Registration by Web Group value correctly when it has been changed. |
173033 | Some users were not be able use the Email selected students option on the Course Roster page. This issue has been resolved so that everyone who can get to this page has the ability to use the option properly. |
174935 | Switching between the Program and Graduation tabs on the Manage student details page did not keep track of the degree selected. When selecting a different degree, the information may not appear. This issue has been resolved by keeping track of the selected degree and showing that degree when switching to the other tab. This also ensures that the degree information appears correctly. |
175185 | The Grade entry page did not appear properly for courses that have child cross listed courses. The column headers did not match up with the column data in this case. |
175509 | In the Registration Administration hub, the Create catalog option was missing from the hub options drop-down. |
Enhancements
Many features that previously were only in the desktop application are now conveniently available in the J1 Web application. Manage your course catalog and the sections in each term. Register students, move them to different sections, and drop or withdraw them. Manage your faculty. Administer student information and holds.
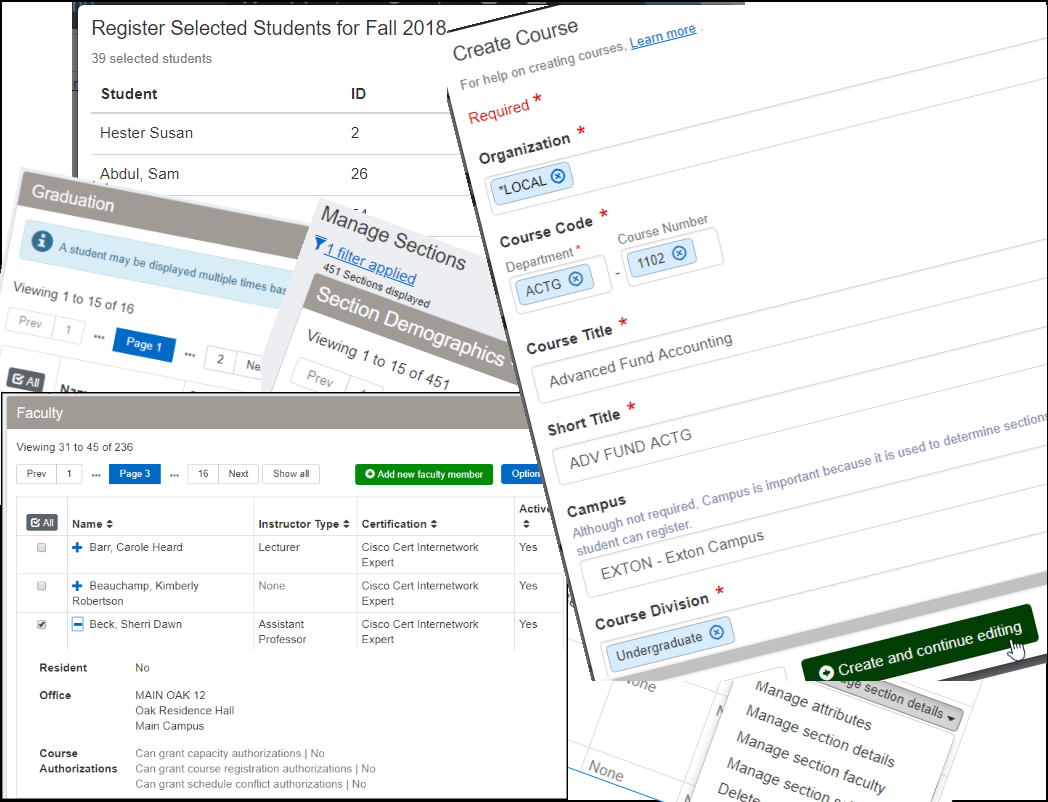
You will find new Registration features in these hubs:
Registration Administration hub
Registration Operations hub (formerly Registration hub)
Academic Department hub (formerly Courses hub)
Faculty hub
In the Registration Administration hub, you can now:
Create and manage catalog courses
Create and manage sections for each term
Add and manage faculty
Manage Registration Roles and Settings
In the Registration Operations hub (formerly the Registration hub), you can now:
Register students
Drop and withdraw students
View and edit student information
These new features join the features that were already available, such as managing roles, configuring settings, and processing attendance. Likewise, the Academic Department hub (formerly the Courses hub) and the Faculty hub retain useful features such as viewing rosters, entering grades, granting overrides, reporting attendance, and contacting students.
We have added a section to the online help with information about setting up J1 Web Registration features. See the Registration Admin Hub Setup Checklist in J1 Web Online Help, or download the Registration Admin and Setup Guide PDF.
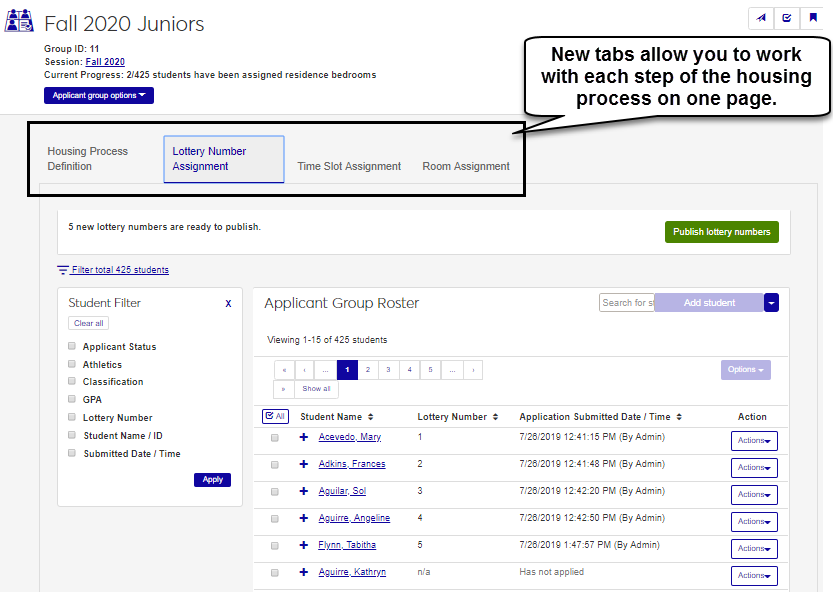
You can create and manage both catalog courses and their sections. The process is similar for each, but sections include specific information such as schedule and instructors.
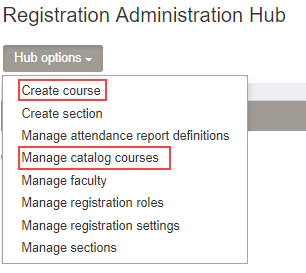
The Manage Catalog Courses page shows information related to each course, including enrollment, capacity, grading settings, credit hours, and more. To see all the information available on this page, use the view drop-down in the table title to switch between views.

Learn more about managing catalog courses. [link to regadmin_online help]
Use these pages to create new sections and to manage existing ones.
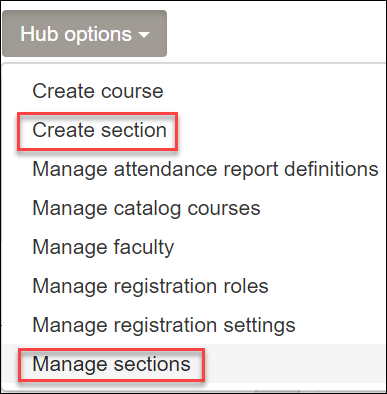
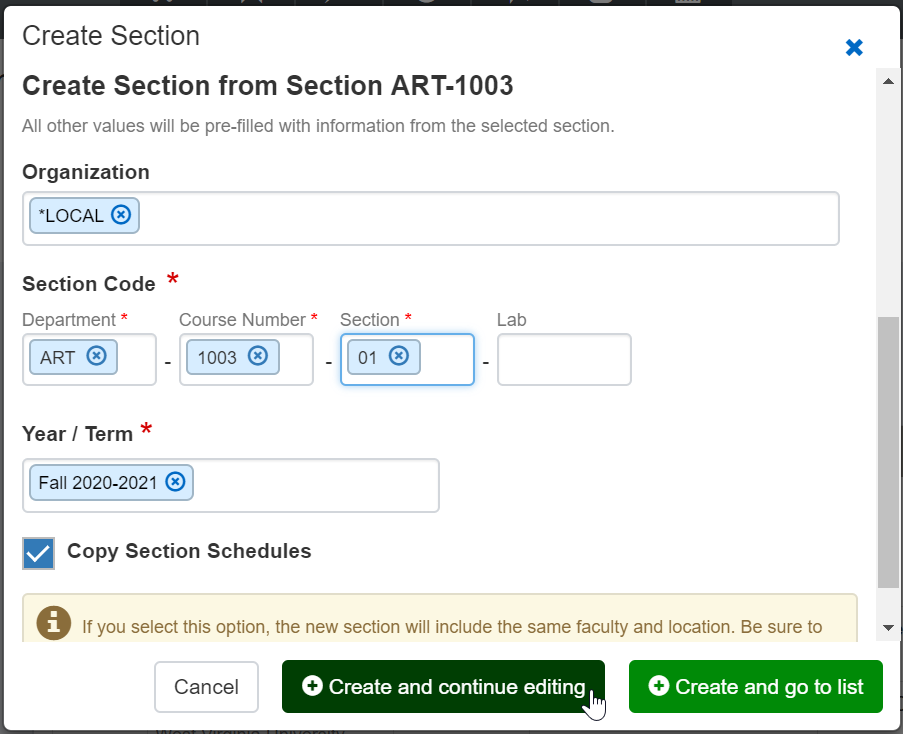
You can create sections from the catalog, from an existing section, or from scratch.
The Manage Sections page shows information related to each section, including term, scheduled times, current enrollment, financials, and more. To see all the information available on this page, use the view drop-down in the table title to switch between views.
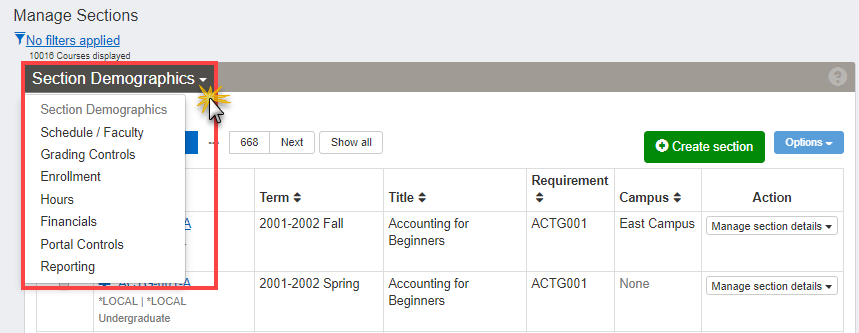
You can manage different details depending on which table view is selected.
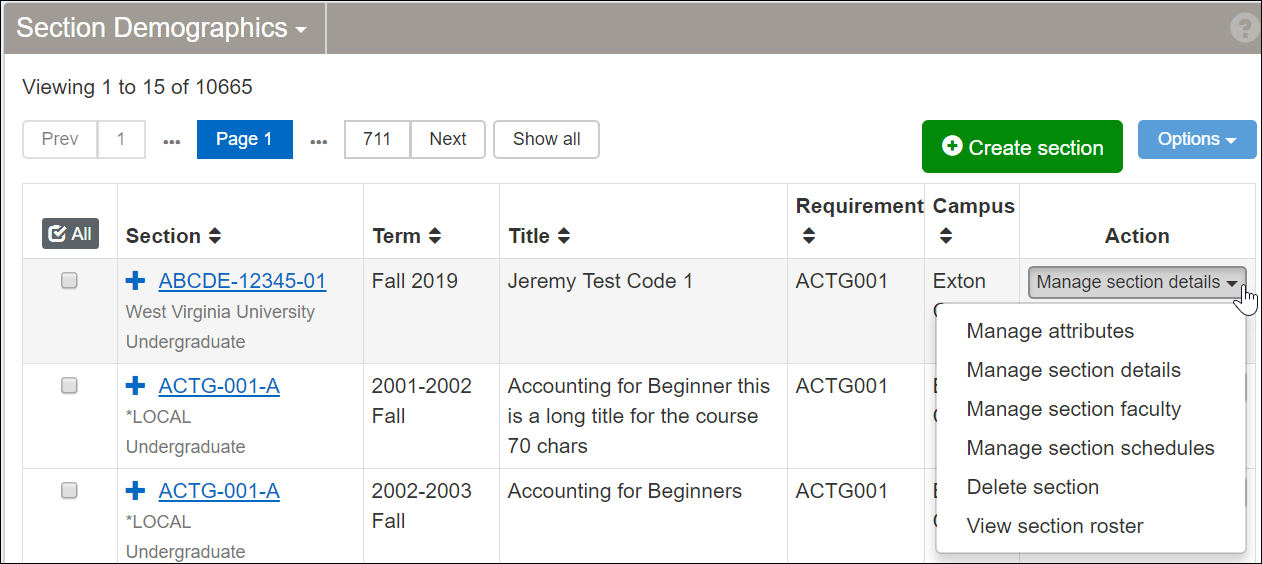
In some views, you can select multiple sections and edit their details.

Learn more about managing sections. [link to online help topic]
In the Registration Administration hub you manage faculty information—certifications, office information, authorization (override) permissions, and instructor type. You can filter the faculty list to work with faculty that match your criteria.
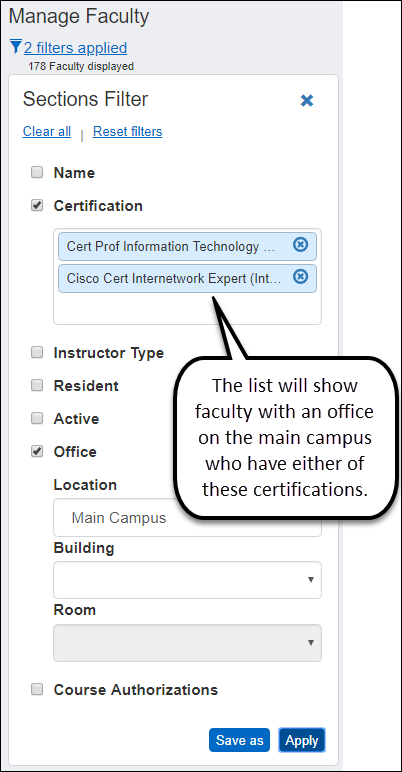
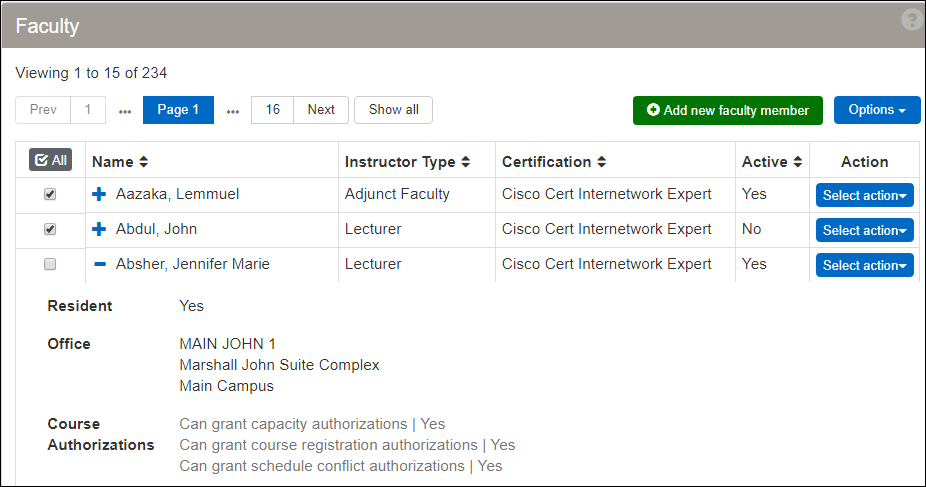
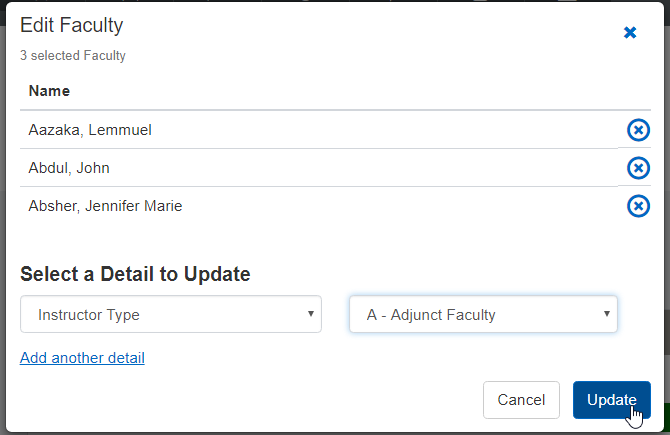
You can edit information for a single faculty member or several at once. Select a detail to update and the new value. You can then add more details to edit.
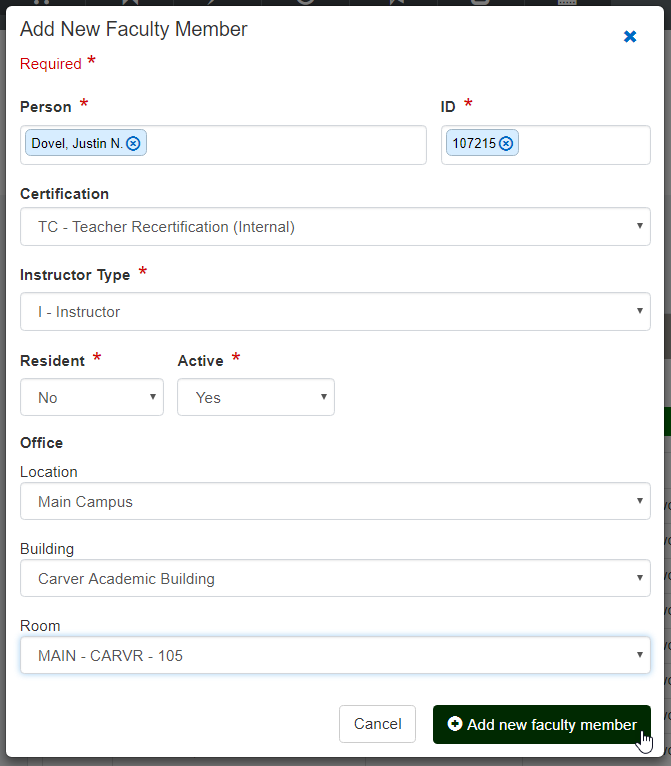
You can add people in your database as faculty members. Search for them by name or ID.
Learn more about managing faculty. [need to add link to Reg help]
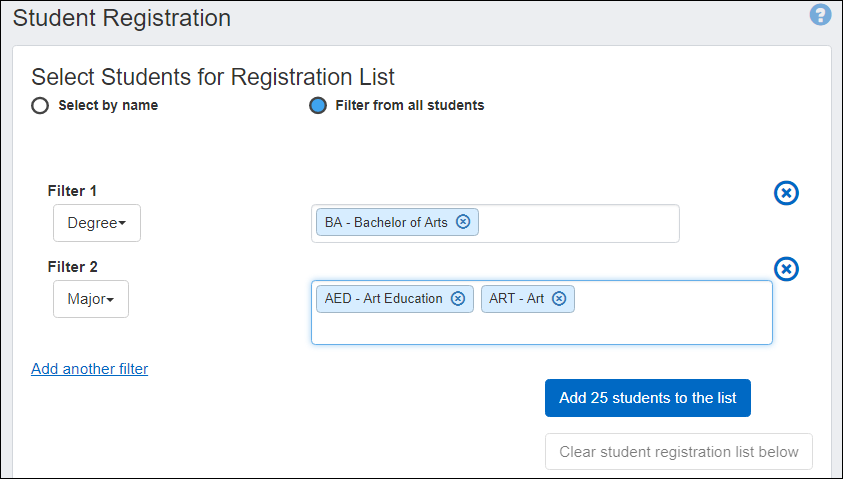
In the Registration Operations hub you build lists of students you want to work with. You can find students individually by name or ID.
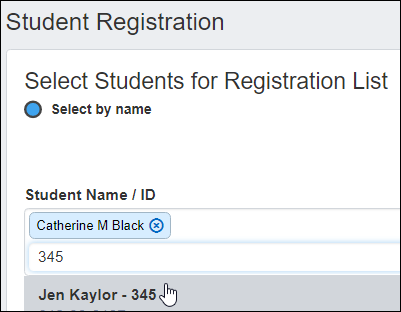
Or you can narrow a full list of students to just those who match your filters.
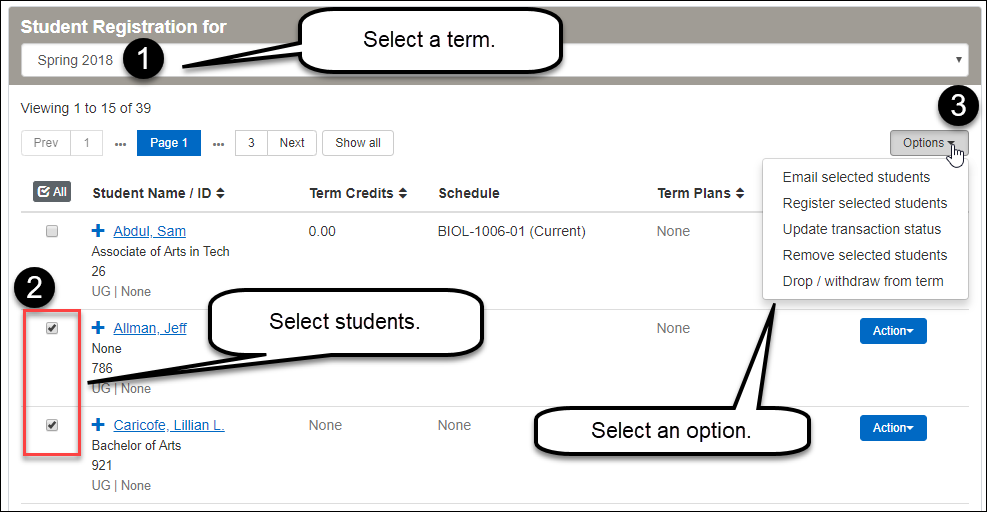
Then you select a term, one or more students, and an option in the Options drop-down.
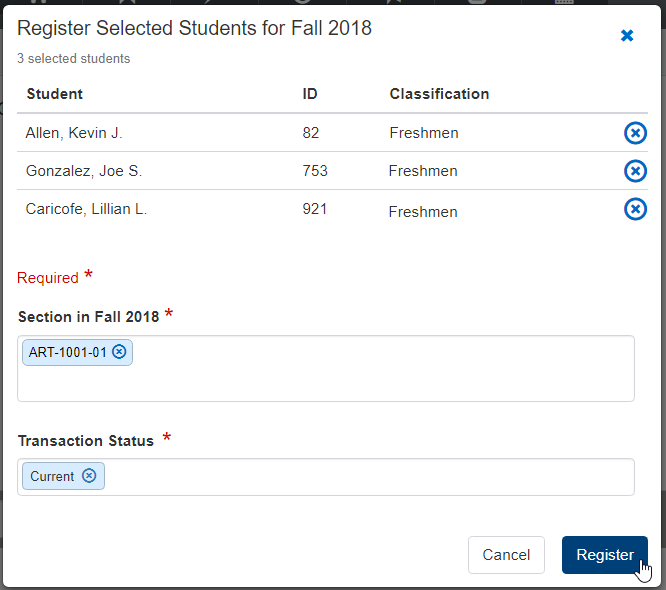
Register the students for a section in the selected term.
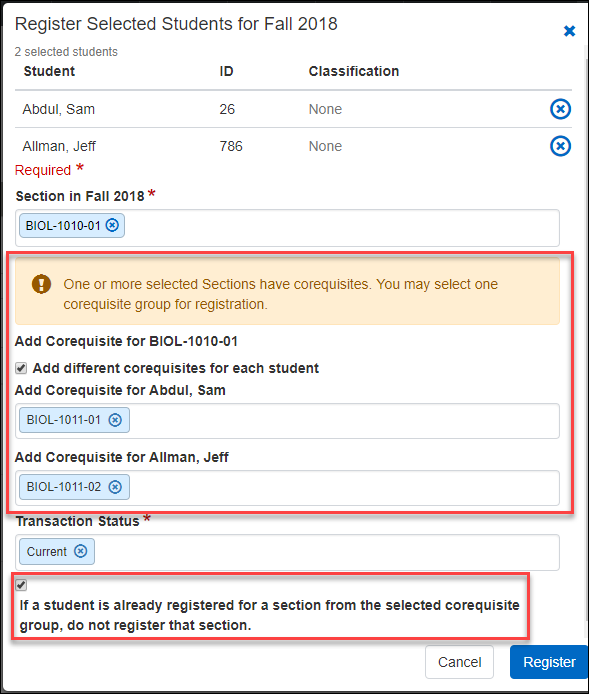
If the section has corequisites, a message notifies you, and you can select a single coreq section for all the selected students or different coreq sections for each selected student.
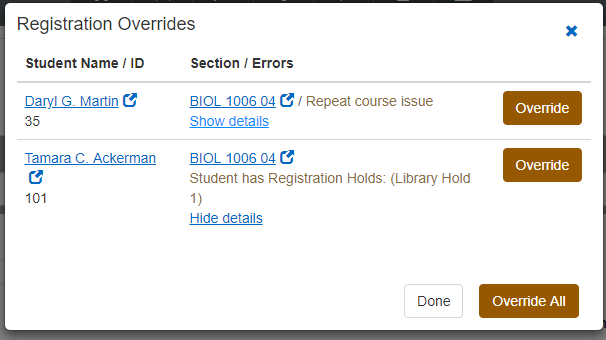
If any of the students have registration errors, the Registration Overrides pop-up opens. You can override the issues for one student at a time or for all the listed students at once.
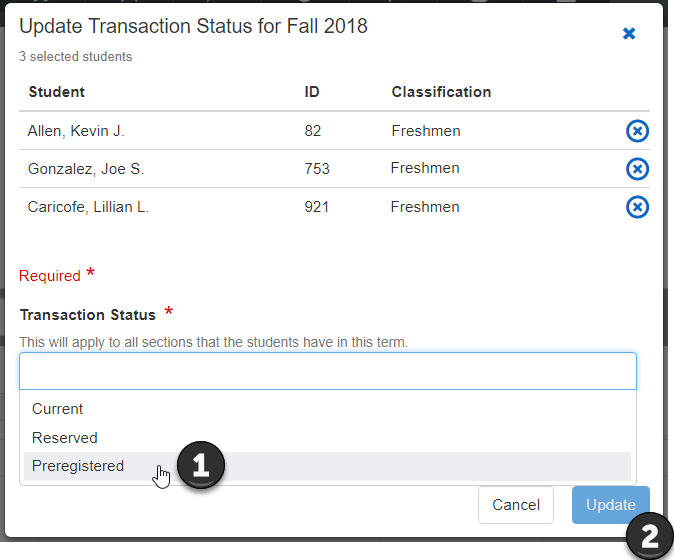
You can change the transaction status for selected students in all the sections they have in a term.
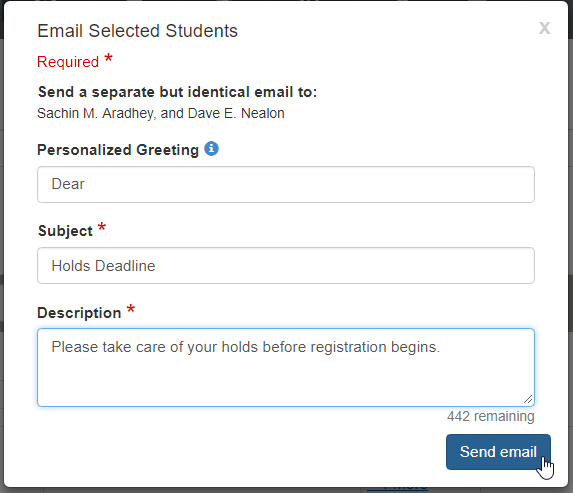
You can send an email to each of the selected students.
You can withdraw the selected students completely from the term.
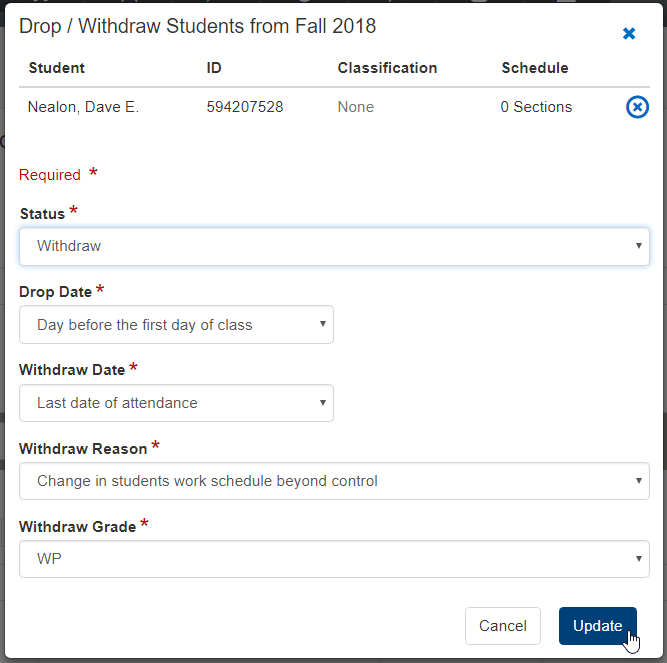
For an individual student, using the Action button on a student's row, you can drop or withdraw any or all of their sections.
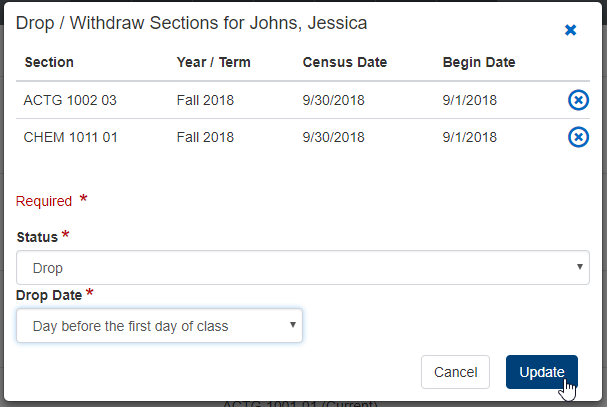
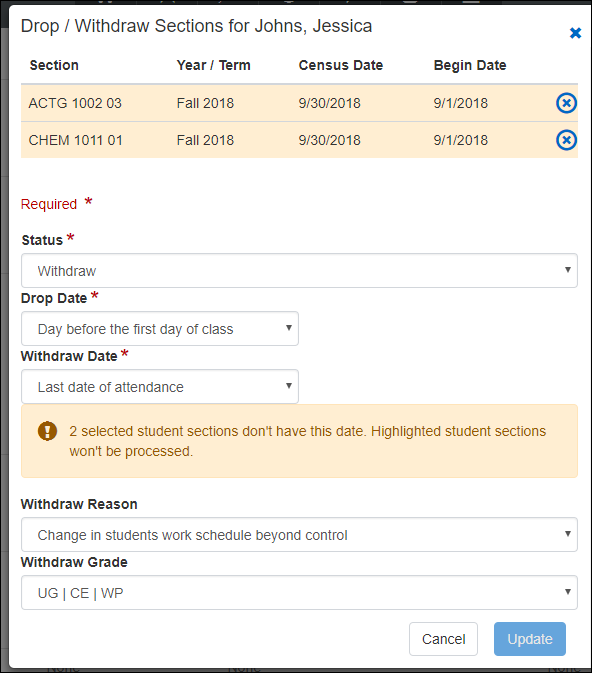
Learn about Student Registration. [need to add link to reg help]
From a student's summary page, you can view a student's sections for all terms. For each section, you can set and lock the repeat value. You can also drop, withdraw, or delete one or more sections from a student's registration for a term.
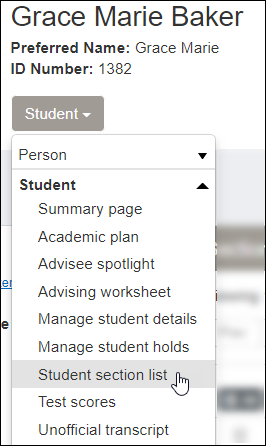
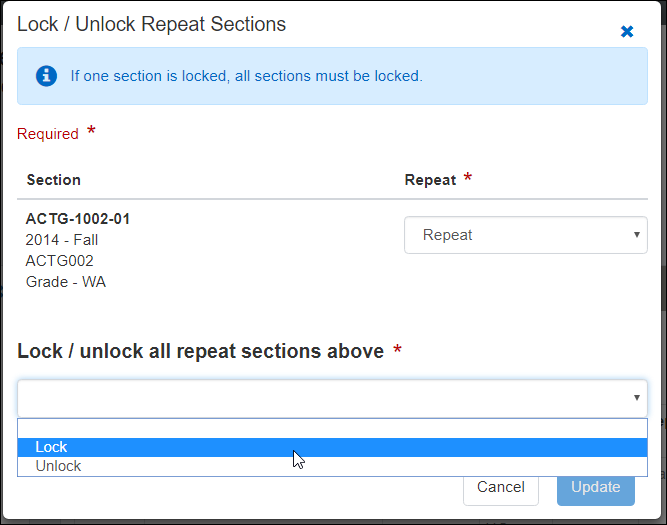
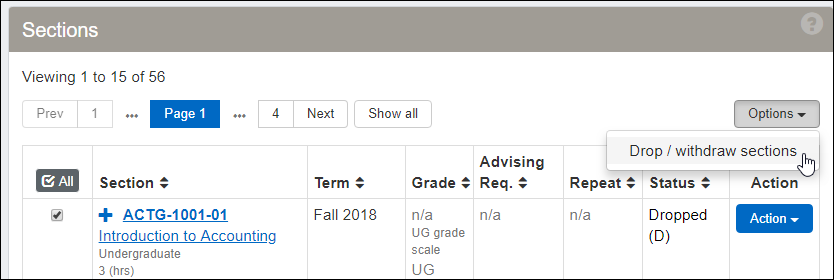
Learn more about managing student section lists. [need to add link to reg help]
Use this page to view and edit and information for the students in a section. The information appears in three views.
Section Info: section status (that is, the student's transaction status for the section), division, advising requirement code, and dozens of other fields about the section.
Student Info: division, billing status and payment information, and dozens of other fields.
Academic: grades, repeat information, credits, and tests.
You can edit section details for a single student or for several students simultaneously.
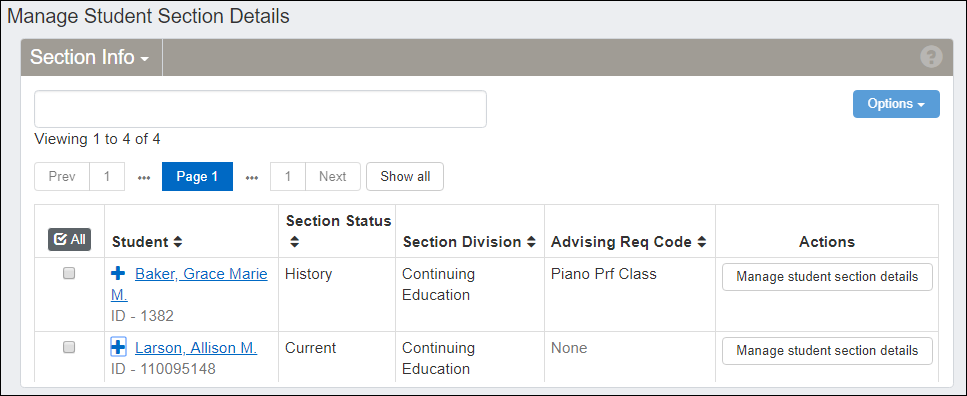
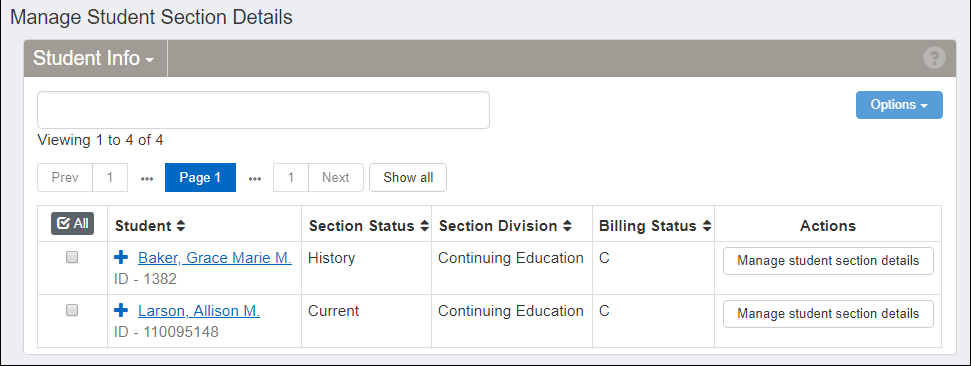
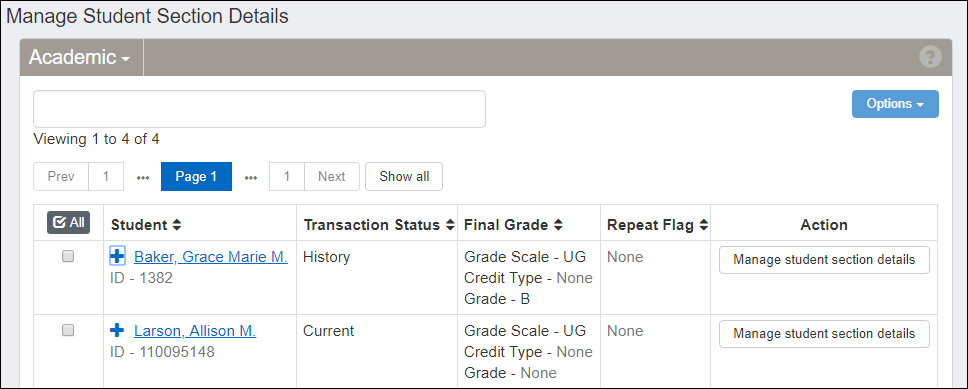
Learn more about managing student section details. [need to add link to reg help]
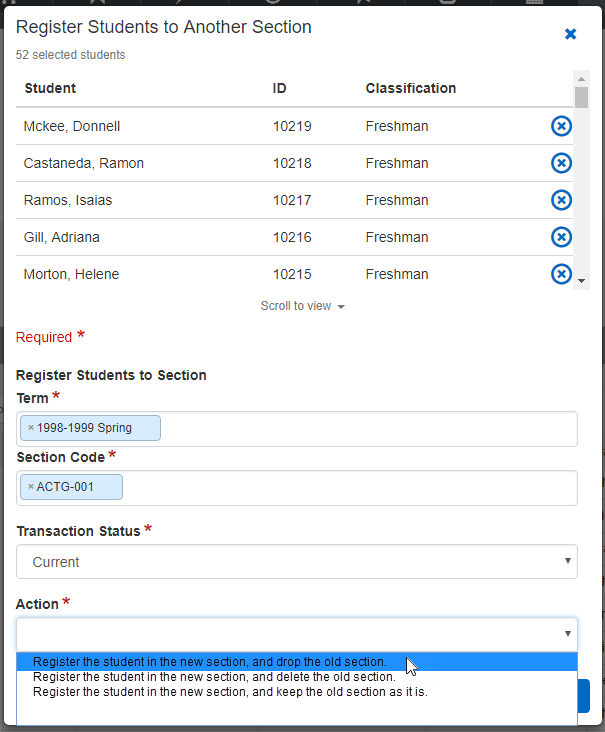
From a section's roster, you can move students to a different section. This helps you balance enrollment in various sections or better fit the constraints of your facilities and schedules.
When you move students to a new section, you can select an option for what to do with the old section.
Delete it (so it doesn't show in the student's course history).
Drop it (so it appears as a dropped course).
Keep it (so the student is enrolled in both).
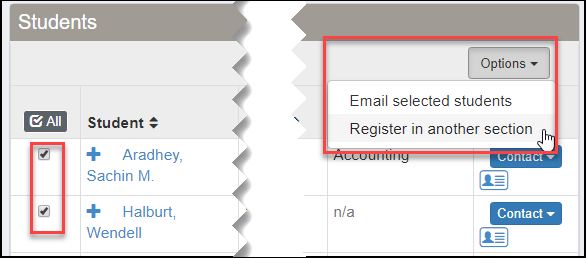
Learn more about what you can do on the Course Roster page. [add links to reg help]
The Registration Operations hub options drop-down includes six student information pages:
General
Enrollment
Division
Program (Degree)
Graduation
Academics and Financials
Each page is a list of students with information on each. On each page, use the Action button to see more details for an individual student. The Graduation page also allows you to manage graduation stages for the student. Use the filter to narrow down the list of students.
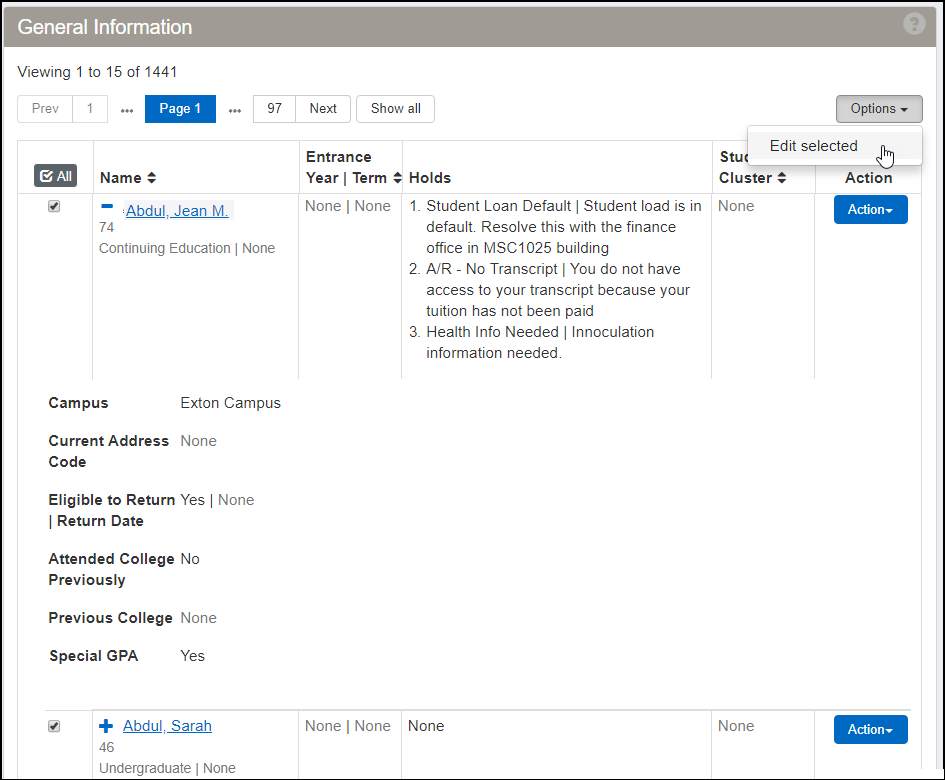
You can edit information for multiple students at once.
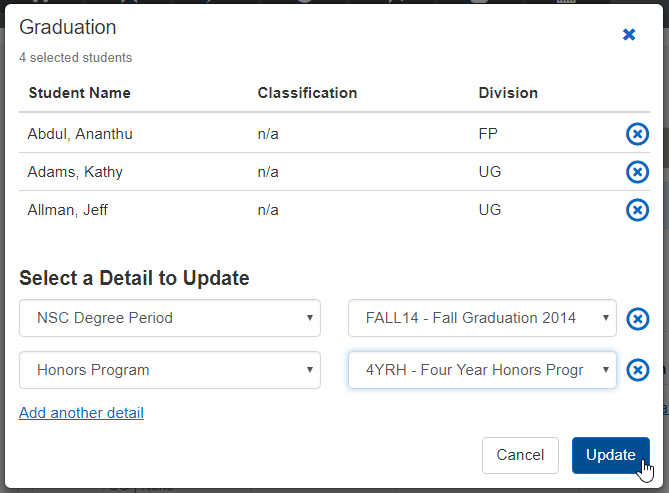
Learn more about the options on the Registration Operations hub. [need link to reg ops hub]
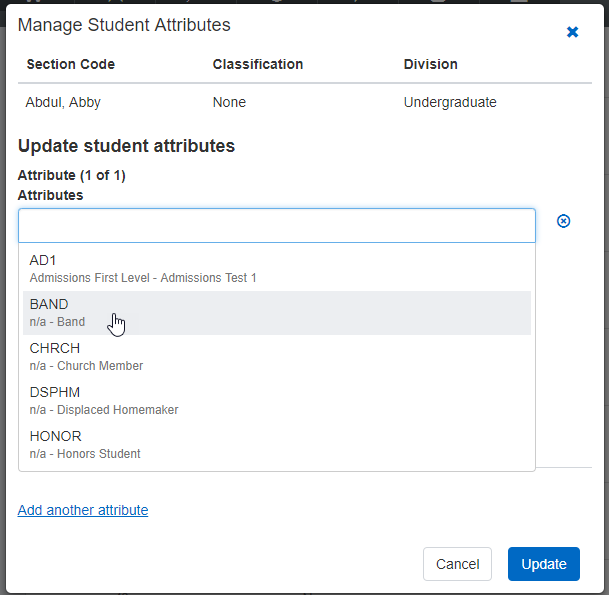
From the General Information page, you can add and remove student attributes. You can also select whether they appear with other student information on the Campus Portal.
Important
Attributes are available to schools licensed for Non-Traditional Registration.
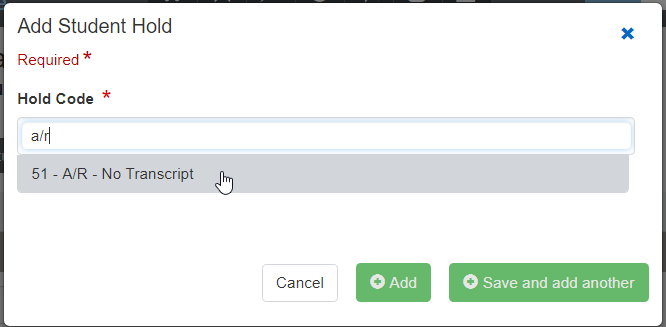
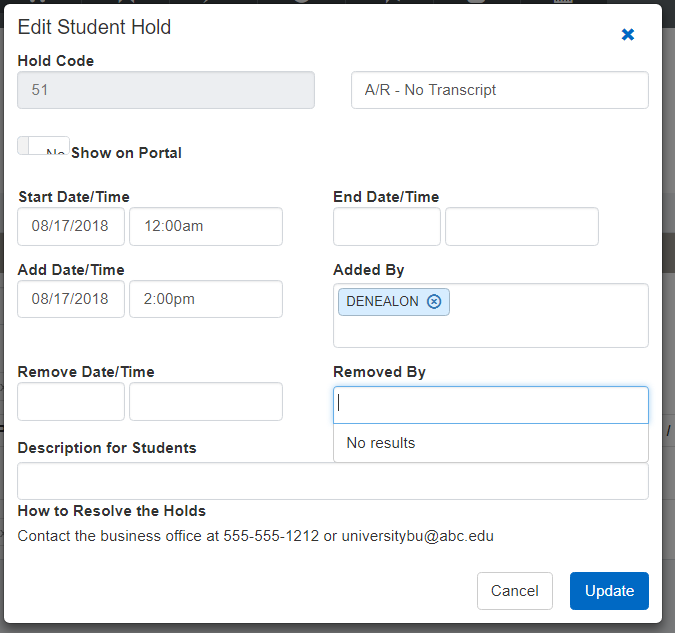
On the Student Holds page, you can add a new hold, and you can edit, remove, or delete an existing hold.
Learn more about managing student holds. [need link to reg help]
The student information that's available in the Registration Operations hub is also available from a student's summary page. There, it's about the individual student, and it's organized into tabs on a single page. You can edit all the information on a page at once. You can edit information and add and remove records such as programs, divisions, graduation stages, and student term records.
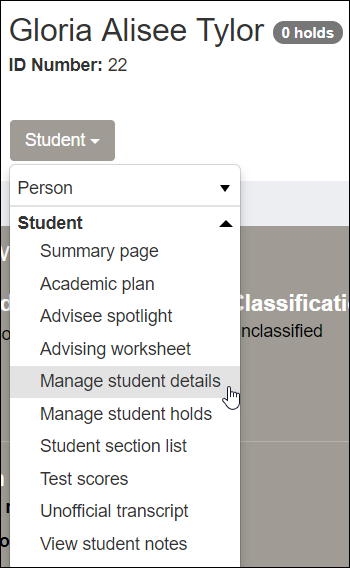

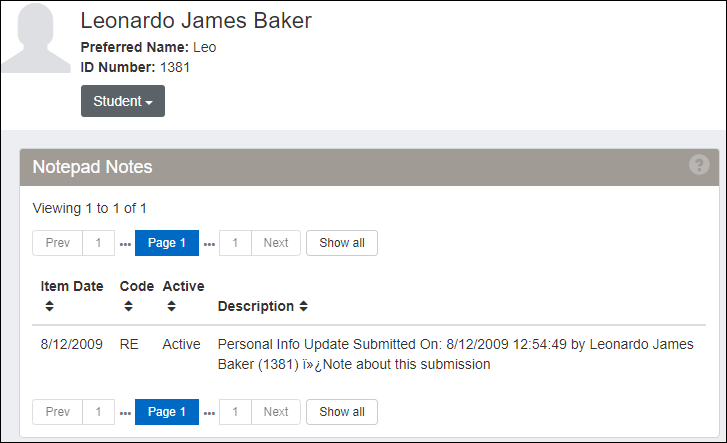
From a student's summary page, you can view Notepad notes about students. If you need to edit the notes, use the J1 Desktop Notepad window.
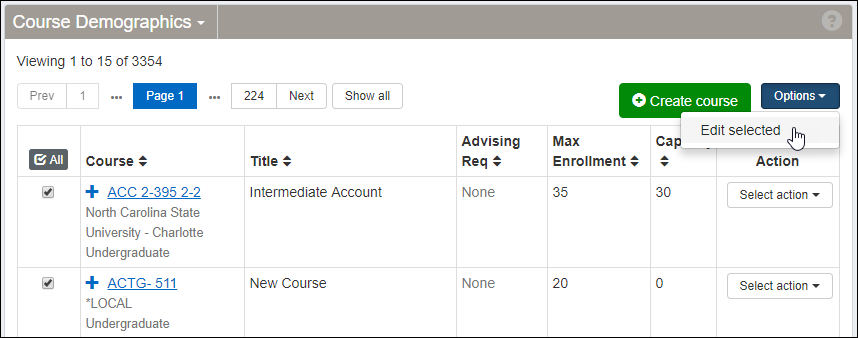
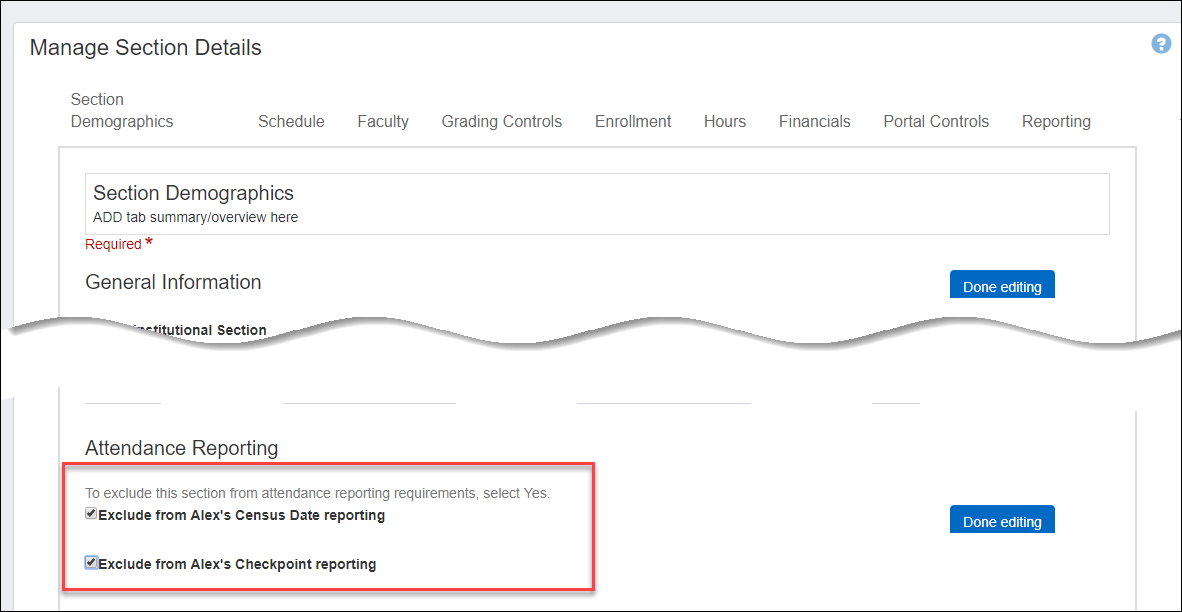
Schools that use attendance reporting can exclude particular courses or sections from reporting requirements, but previously they had to use the J1 Desktop Catalog and Courses windows to do it. Now you can take care of it within J1 Web.
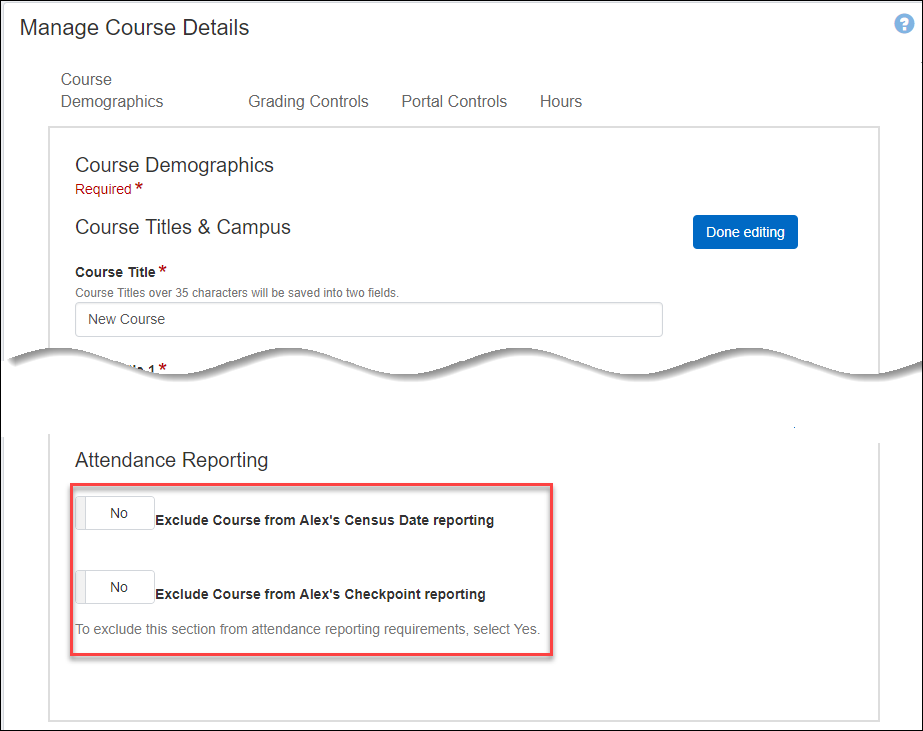
If you want to exclude particular courses from Census Date reporting, Checkpoint reporting, or both, you can do that on the Manage Course Details page.
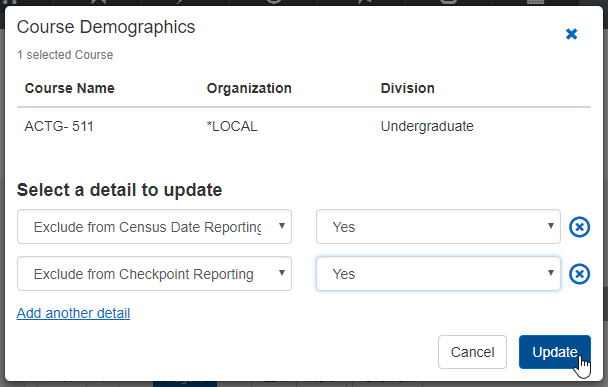
You can also edit this setting on the Manage Course Details page.
To exclude individual sections, use the Manage Sections page.
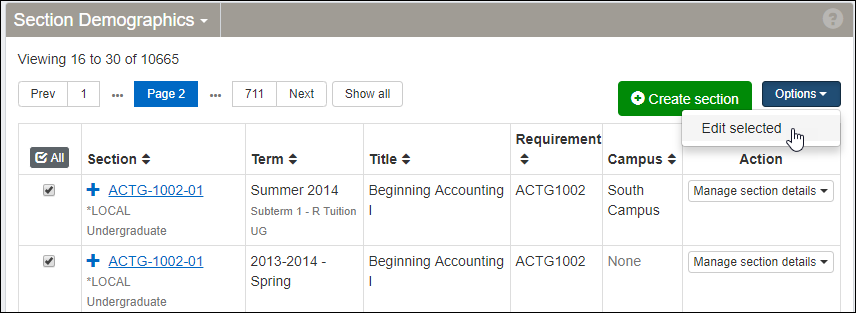
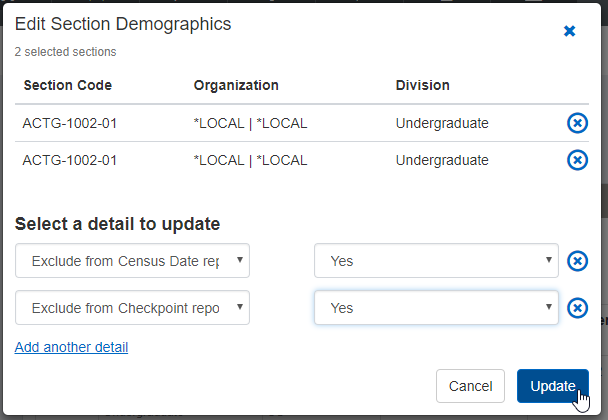
You can also edit this setting on the Manage Section Details page.


Learn more about Registration Settings. [need link to reg help]
You can set defaults for what happens when registrars drop and withdraw students. Set defaults for the drop and withdrawal dates, withdrawal reason, and withdrawal grade.
In addition, you can set the default for the drop flag. 'Drop' means that by default, every course dropped using this feature will have the Drop Flag on. 'None" means that by default, no courses dropped using this feature will have the Drop Flag on. No matter which you select as the default, when a registrar drops a student section, they can still change the Drop Flag to either 'Drop' or 'None'.
Note
The dropped course will have a transaction status of 'Dropped' regardless of the Drop Flag's value.
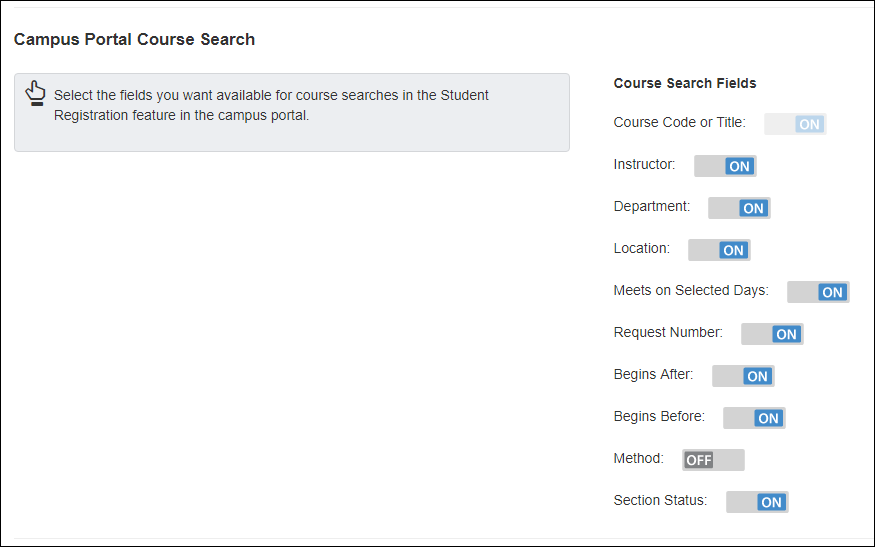
Select the fields that show when students search courses in the Student Registration feature of the Campus Portal (JICS).
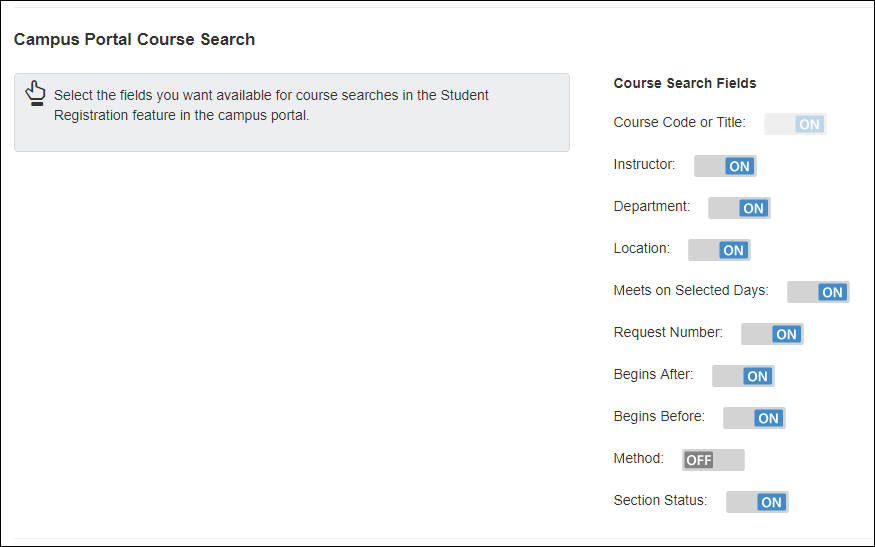
Learn more about Registration Settings. [need to add a link to Reg help]
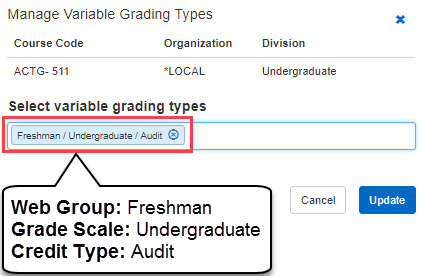
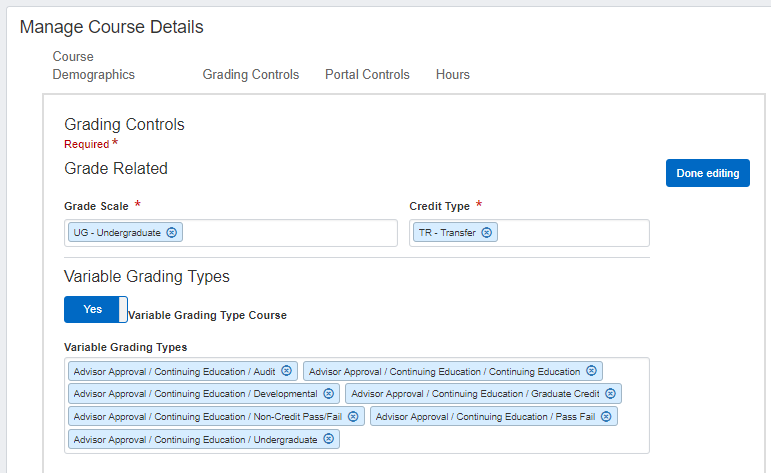
In the Registration Administration hub, you can manage which variable grading types that students will be able to select in Campus Portal. You will find this setting under Manage Catalog Courses or Manage Sections, on the Grading Controls view of the table. You can turn variable grading types on or off in the Manage Course Details or Manage Section Details windows.
Learn more about Variable Grading Types. [need link to Reg help]
You can now filter based on keywords in all General Information fields with the exception of Holds.

Registrars and Registration Module Managers have several new Student Management permissions available. See the J1 Web System Administration release news topic for more information.
Resolved Issues
Issue | Description |
|---|---|
155515 | A setting in J1 Desktop Grade Table Definition window was causing an error when user attempted to Manage grades in J1 Web. |
167697 | Opening certain windows like Courses or Student Registration was giving a "Specify Retrieval Argument" dialog box. This issue is now resolved. |
169604 | In some cases, clients without a Registrar license would see the Registration Operations hub in the hub menu, but they could not access it. This has been resolved so that clients without the Registrar license will now see the appropriate blocks on the Registration Operations hub. |
170036 | Clients without a Registrar license were unable to add or revoke course overrides from the Faculty hub. The Registrar license is no longer required to manage course overrides in J1 Web. |
170526 | The SQL queries used by the triggers on the STUDENT_CRS_HIST table related to the J1 Web Registration Primary and Secondary permissions have been revised to perform more efficiently. |
Enhancements

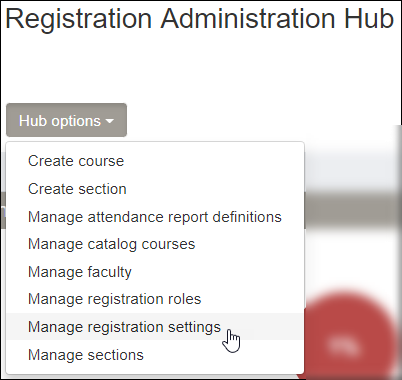
The new Student Registration feature in the Campus Portal replaces the Add/Drop feature. It allows all students to develop their schedules using a planning calendar. If they have an academic plan, it guides them to courses in their plan. If they don't have a plan but have a degree audit, it guides them to courses that meet their remaining requirements. If they have neither an academic plan nor degree audit, they use a general course search to place courses on their planning calendars.
Note
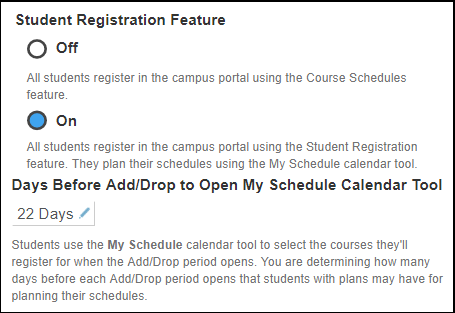
The Student Registration Feature setting replaces the Register by Plan setting.
Off: All students register using the Add/Drop feature. The planning calendar is not available, and students are not guided toward courses that fit their academic plan or meet their degree requirements.
On: All students register using the Student Registration feature. All students can use the planning calendar. Students are guided by their academic plan or degree audit if they have them.
Days Before Add/Drop to Open My Schedule Calendar Tool: Set the number of days before each registration period that students can begin searching courses and using the planning calendar for the next term. (This setting is unchanged from the Register by Plan setting in previous releases. But it now affects all students, not only those with academic plans.)
Caution
The Add/Drop feature no longer includes Register by Plan functionality or the planning calendar. That functionality has all been moved to the new Student Registration feature. In order for students to use them, you must turn on the Student Registration feature.
Select the fields that show when students search courses in the Student Registration feature.
Set several options for what students see in grade reports in the Campus Portal. Although midterm and final grading periods always show, you can show other grading periods that your school has defined. You can also allow narrative grades and numeric grades to show.

Resolved Issues
Issue | Description |
|---|---|
143847 | We have created an update trigger that will keep the Final Grading Period Grade Scale and Credit Type in sync. Note that any additional Grading Period row will need to be updated manually. |